


Published: 4.3.24
Updated: 23.7.24
Today, we're focusing on a crucial component of your dirt bike's health—the fuel filter.
This guide is designed to walk you through the process of installing a new fuel filter, ensuring your bike runs smoothly and maintains optimal performance.
The Critical Role of a Fuel Filter
Understanding the Importance
The fuel filter plays a pivotal role in your bike's engine by trapping dirt and debris, preventing these contaminants from causing damage.
Regularly replacing the fuel filter is a preventative measure that can save you from costly repairs and keep your bike in top condition.
How Often Should You Replace It?
Regular maintenance is key to ensuring your dirt bike runs smoothly, and the fuel filter plays a critical role in this.
Generally, it's recommended to replace the fuel filter at least once a year or every 20,000 miles, whichever comes first.
However, this frequency can vary based on how often you ride and the conditions you ride in.
If you frequently ride in dusty or dirty conditions, you might need to replace the fuel filter more often to prevent clogging and maintain optimal engine performance.
Related: Motorcycle Backfire: 12 Common Causes Explained
Comprehensive Safety Precautions
Prioritising Safety
Before we begin, emphasising safety is crucial. Always wear appropriate protective gear such as gloves and safety glasses.
This protective gear is essential in preventing injuries and ensuring a safe working environment as you perform maintenance on your bike.
Pre-Installation Checklist
Preparation is Key
Ensure you're fully prepared before starting the installation process.
Gather all necessary tools and materials, including the new fuel filter, hose clamps, pliers, and a screwdriver.
Having everything at hand will streamline the installation process and prevent any unnecessary interruptions.
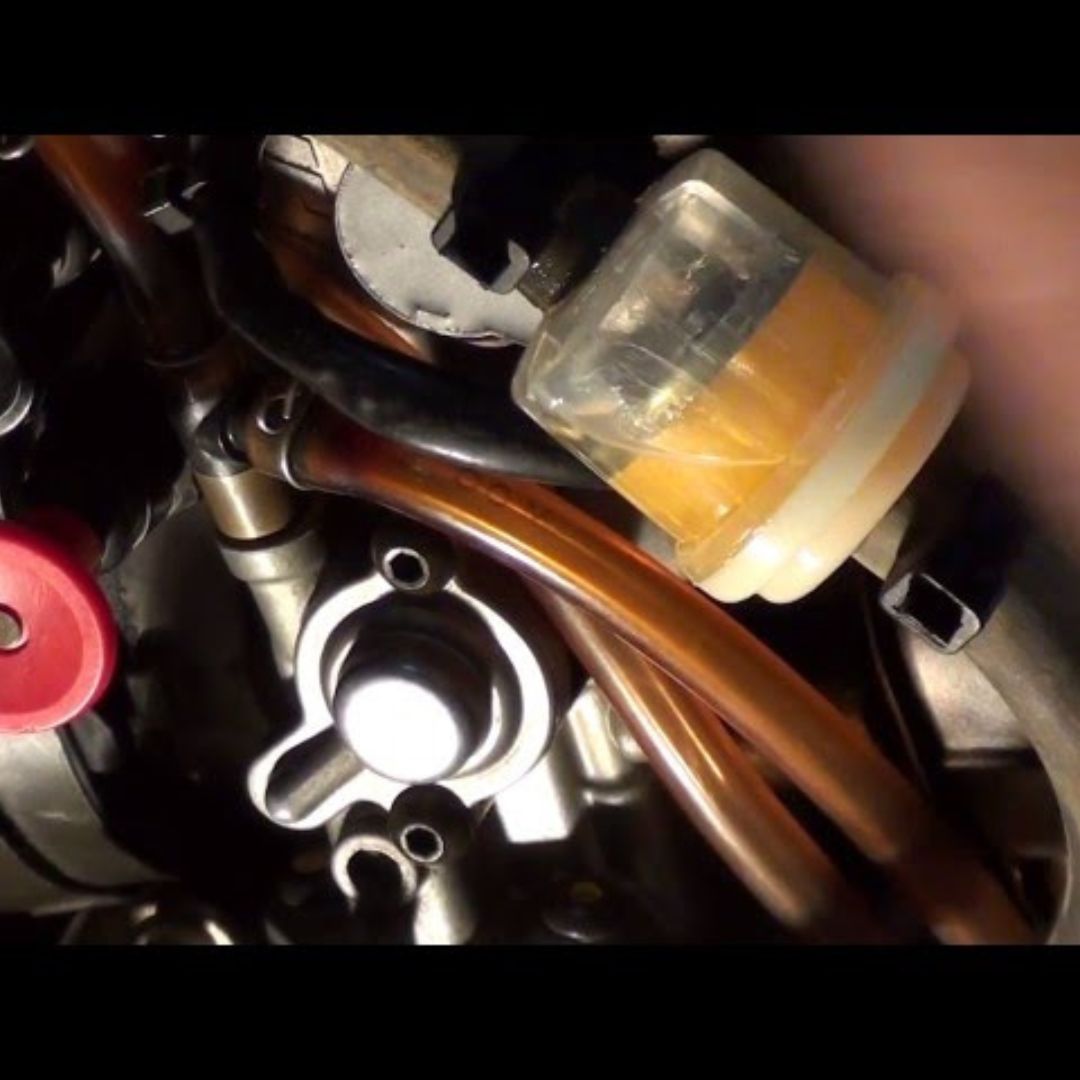
Identifying the Fuel Filter's Location
Locating the Filter
The fuel filter's location can vary depending on the model of your dirt bike.
It's generally found along the fuel line, between the fuel tank and the carburetor.
If you're unsure, consult your bike's manual for specific guidance on locating the fuel filter.
Proper identification is the first step to a successful installation.
Safe Removal of the Old Fuel Filter
Removing the Old Filter
Carefully disconnect the fuel line using pliers, paying close attention to avoid any fuel spillage or damage to the line.
Removing the old fuel filter requires a gentle touch and precision to ensure a smooth transition to the new filter.
Installing the New Fuel Filter
Installing the New Filter
With the old filter removed, it's time to install the new fuel filter.
Pay attention to the direction of fuel flow, indicated by an arrow on the filter, to ensure correct installation.
Use hose clamps to secure the filter in place. If you encounter any difficulties, remember that patience and careful adjustment are key to a successful installation.
Ensuring Correct Flow Direction
When installing the new fuel filter, it's crucial to ensure that it's oriented correctly to allow fuel to flow in the right direction.
Most fuel filters have an arrow indicating the direction of flow, which should align with the direction from the fuel tank to the engine.
Incorrect installation can lead to fuel supply issues, affecting your bike's performance.
Take a moment to double-check this alignment before securing the filter in place.
Reconnecting the Fuel Line and Final Checks
Finalising the Installation
Reconnect the fuel line securely, ensuring there are no leaks.
A thorough final check to confirm everything is properly tightened and in place is essential for the safety and functionality of your bike.
Double-Checking Connections
After reconnecting the fuel line, take an extra moment to double-check all connections.
Ensure that hose clamps are tight and secure, and there are no twists or kinks in the fuel line that could impede fuel flow.
This step is vital for preventing leaks and ensuring that the fuel system is sealed properly.
A thorough final inspection now can save you from troubleshooting issues later.
Post-Installation: Testing and Maintenance
Testing and Ongoing Care
Start your bike to test the new fuel filter's installation. Listen for any unusual sounds and inspect for leaks.
Regular maintenance and inspection of the fuel filter will prolong its life and contribute to the overall health of your bike.
What to Do If You Notice Leaks
After installation and during the initial test, if you notice any fuel leaks, it's important to address them immediately.
First, turn off the engine and locate the source of the leak.
Often, leaks occur at connection points, which may require tightening the clamps or ensuring the fuel line is fitted properly.
If the leak persists, double-check the fuel filter's orientation and ensure it's not defective.
Addressing leaks promptly prevents fuel wastage, environmental harm, and potential safety hazards.
Common Signs That Indicate a Dirt Bike Fuel Filter Needs Replacement
Here are the common signs that indicate a dirt bike fuel filter needs replacement:
- Poor Engine Performance: The engine may hesitate, surge, or sputter, especially under heavy loads or when accelerating. You may notice a loss of power or decreased performance overall.
- Hard Starting: The bike may take longer than usual to start or require more cranking before the engine fires up. This is due to restricted fuel flow through the clogged filter.
- Stalling: The engine may stall repeatedly while riding, particularly during acceleration or deceleration. This occurs when the engine is starved of fuel due to the restricted flow.
- Rough Idle: The engine may run roughly or inconsistently at idle, indicating fuel flow issues.
- Throttle Hesitation: There may be a delay or hesitation when opening the throttle, as the clogged filter prevents adequate fuel from reaching the engine quickly.
- Check Engine Light: On bikes equipped with electronic fuel injection, a clogged fuel filter may trigger the check engine light due to lean fuel conditions.
- Decreased Fuel Efficiency: A dirty fuel filter can lead to poor fuel economy as the engine struggles to get enough fuel.
- Strong Fuel Odors: In some cases, a damaged filter may allow fuel leaks, resulting in noticeable fuel smells around the bike.
It's important to note that these symptoms can also be caused by other fuel system issues. However, if you notice multiple signs, especially if your fuel filter hasn't been replaced in a while, it's a good indication that the filter may need attention.
Regular inspection and replacement of the fuel filter as part of routine maintenance can help prevent these issues and ensure optimal performance of your dirt bike.
Detailed Troubleshooting Tips for Issues After Fuel Filter Installation
| Issue | Symptoms | Troubleshooting Steps |
|---|---|---|
| Fuel Flow Issues |
|
|
| Leaks at Connection Points |
|
|
| Engine Performance Issues |
|
|
| Fuel Pressure Problems |
|
|
| Vacuum Issues |
|
|
| Regular Maintenance and Inspection |
|
|
Conclusion: Moving Forward
Congratulations on successfully installing a new fuel filter on your dirt bike.
This guide aimed to empower you with the knowledge to perform this maintenance task confidently.
Embracing these tasks not only enhances your bike's performance but also builds your mechanical skills.
FAQs
| Question | Answer |
|---|---|
| How Often Should I Change My Fuel Filter? | Most manufacturers recommend changing your fuel filter between every 20,000 and 150,000 miles, depending on the vehicle's age and usage conditions. For diesel engines, the interval might be more frequent due to the higher impurity levels in diesel fuel. |
| What Are the Signs That My Fuel Filter Needs Replacing? | Common signs that indicate a fuel filter needs replacement include:
|
| What Does a Fuel Filter Do? | A fuel filter removes impurities and debris from the fuel before it reaches the engine. This helps maintain engine performance, protect fuel injectors, and ensure efficient combustion. |
| Can I Clean and Reuse My Fuel Filter? | Most fuel filters are designed to be replaced rather than cleaned. However, some metal filters can be cleaned with a solvent cleaner if they are not too grimy. Nylon or paper filters should be replaced. |
| Where Is the Fuel Filter Located? | The location of the fuel filter varies by vehicle make and model. It can be found in the fuel tank, along the fuel line, or mounted on the vehicle frame. Newer vehicles often have the filter integrated with the fuel pump inside the tank. |
| How Much Does It Cost to Replace a Fuel Filter? | The cost of replacing a fuel filter can range from $10 to $50 for basic in-line filters. More complex filters, especially those integrated with the fuel pump, can cost more. Labor costs can also add to the total expense if done by a professional. |
| What Tools Do I Need to Replace a Fuel Filter? | Basic tools needed for fuel filter replacement include:
|
| How Do I Know If My Fuel Filter Is Clogged? | A clogged fuel filter can cause reduced fuel pressure, leading to engine performance issues such as misfires, stalling, and difficulty starting. A fuel pressure test can confirm if the filter is clogged by measuring the pressure at the fuel rail. |
| Can a Clogged Fuel Filter Damage My Engine? | Yes, a clogged fuel filter can force the fuel pump to work harder, potentially leading to pump failure. It can also cause fuel injectors to become contaminated, resulting in poor engine performance and possible damage. |
| Is Fuel Filter Replacement Included in Regular Vehicle Service? | Fuel filter replacement is typically included in major vehicle services, especially if it is due according to the service schedule. Always check your vehicle's manual for specific maintenance intervals. |
Get in Touch 🚀
Loved our article on “How to Install A Fuel Filter on Your Dirt Bike” Got the itch to dive into more wheely-awesome info?
Whether you're a parent or a grandparent, we're here for all your kids ride-on toy questions! 🚗💨
Feeling click-happy?
Jump straight into our wonderland at RiiRoo.com.
Or, if you're more the chatty type, give our Live Chat a whirl and let's talk toys!


Share:
Why Does My Dirt Bike Have Reduced Engine Power?
How Much PSI Is The Right Amount For My Dirt Bike?